Introduction
The information in this blog is not supported by Microsoft. The reason I want to shrink my disks is that I want to save money on storage for my lab environment. When Azure started with managed disk they charge for the disk size and not disk usage as it was with previous disks. This gives us a reason to optimize size and save money on disk, since this cost of disk is ticking even if the VM is deallocated. In Azure you can expand a disks but it’s not supported to shrink disks. The scenario in this blog is that I use the gallery image of Windows latest version. Feel free to follow but remember that this is not supported and I use it for my Dev environment. You can also use this to create you own disk images to use for setup of new VMs, but this requires some other steps also that is not covered in this blog, like SYSPREP. The benefits with creating your templates is that you can use them for example when you deploy with bicep.
Prepare the disk to shrink
Start the VM that you want to Shrink. Go to Disk Management(diskmgmt.msc). Here you can shrink the volume Windows (C:) to the size you prefer. This must be smaller than the size you later set when you shrink the .vhd.

When the shrink is ready turn of the VM from Azure Portal and make sure that it’s deallocated.
Shrink the VHD file
When you will reduce the file size of the .vhd I have some trix I prefer. I use a VM in Azure that is hosted in the same region as the VM with the disk I want to shrink. This makes my download/upload time of the disk fast.
When I create a VM for this operation I attach an SSD disk of 300 GB. You will need at least 2 times the disk size (2×127 GB) for this operation.
If you will deploy a new VM for this operation, make sure you select one that supports Hyper-V. I am using (Standard E2as v5 (2 vcpus, 16 GiB memory).
On the machine you will use make sure that both Hyper-V and Azure Storage Explorer are installed.
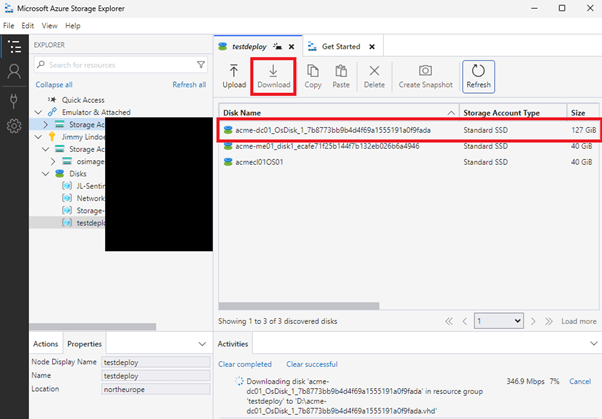
Open and sign-in to Azure Storage Explorer. Expand the resource group and select the disk you want to shrink. Download the disk to your Hyper-V VM.
Start PowerShell on the computer running Hyper-V and has the disk.vhd file saved. We need to convert it to .vhdx to be able to shrink it.
Convert-VHD -Path "d:\SourceOSdisk.vhd" -DestinationPath "d:\shrinkdisk.vhdx"First when you have a VHDX file you can shrink the disk. You can remove your SourceOSdisk after the first operation to free up space on the disk. When you select resize, size make sure to set the Size in GB.
resize-VHD -Path " d:\shrinkdisk.vhdx" -SizeBytes 40GBNow we can convert the disk back to a .vhd file to use it in Azure. The name you choose here is the name that will be used for the disk in Azure.
Convert-VHD -Path " d:\shrinkdisk.vhdx" -DestinationPath "d:\Windows11OSImage.vhd"Change the disk in the VM
We now have a disk that is ready to be used for the VM. We now only need to upload the file and swap the disk in the VM.
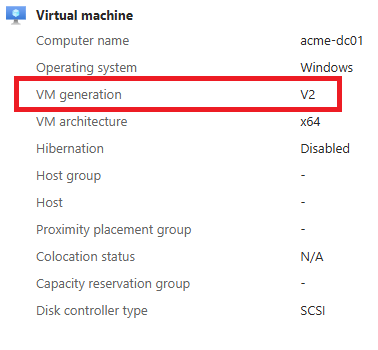
It’s important to look at the VM generation in Azure before we upload the disk. In my case it’s generation V2.
You can now go to the Hyper-V machine and open Azure Storage Explorer. Go to the disks and select the same resource group that you downloaded the disk from. Select upload machine and make sure that you choose the same generation as the VM has and the correct performance of the disk. Then start the upload, click create.

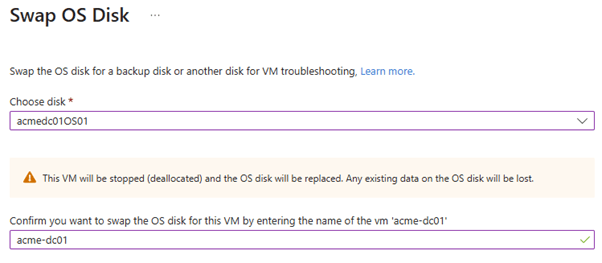
When the upload is ready we can go into the VM in portal.azure.com and select the VM. Go to the disks and select swap OS disk under managed disks.

Now select the disk you uploaded disk. In my case I named it acmedc01OS01.
Make sure that the new disk is connected to the VM. You can now start the VM and check that all is working as it was before. When you feel safe that everything is correct you can delete the old disk.
Summary
Hope this blog post help you with your disk size and also save some money on your Azure Subscription. You should now have a Azure VM with a smaller disk. I you need to expand disk it’s not an issue. If this VM is critical or important, I recommend to setup monitoring of the free diskspace.
